Showing posts with label freezing methods. Show all posts
Showing posts with label freezing methods. Show all posts
Monday, April 6, 2020
Updated Once a Month (Freezer) Cooking Recipes
So I largely (now) get my recipes from Pinterest, and I can determine if they will work for freezing, or if I need to modify them for freezing. I created a new board of freezer cooking recipes. I will be working to update the modifications for using the recipe for freezer cooking in the next few weeks?
https://www.pinterest.com/leannaaker/food-i-ve-made/freezer-cooking-recipes/

Monday, March 23, 2020
Favorite Recipes from the December 2019 Cook
Well, since we're all sort of isolated at home right now, thought I might update the blog with our favorite recipes from our December 2019 cook (which should run out the end of this month.
1). Kung Pao Chicken (https://thewoksoflife.com/kung-pao-chicken/)
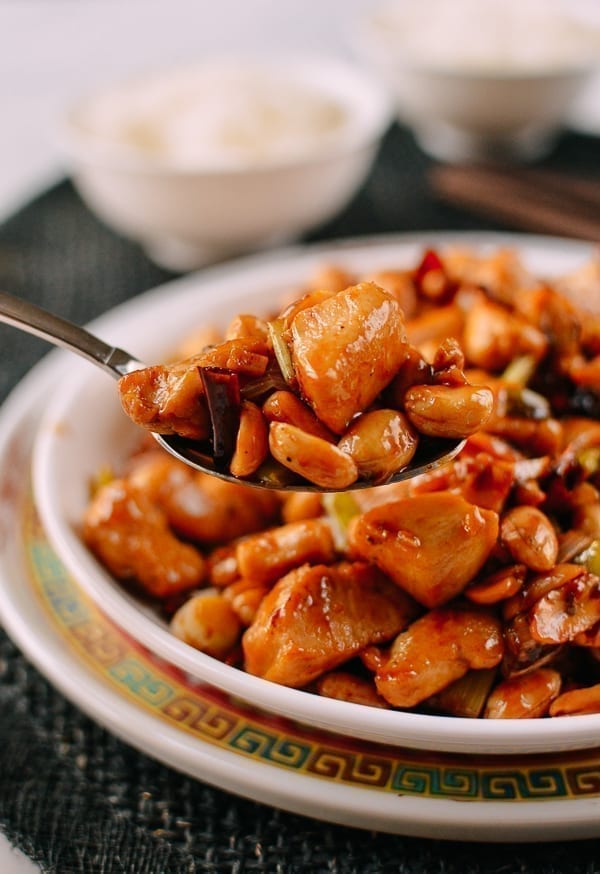 So, it is always amazing when you use authentic spices...how much better a familiar dish can be! The Sichuan pepper powder really makes this dish. I find myself now searching for recipes that use this spice.
 When we make this to freeze, we mix it together with the rice, although we have also done rice frozen into muffin tins for individual portions, too. Best tip on the peanuts is to either: 1) freeze the dish and add the peanuts to the Ziploc afterwards to keep them from getting soggy, or 2) don't use raw peanuts and just keep them on hand to add as you reheat.
2). Irish Lamb Stew with Guinness (https://www.cookingcurries.com/irish-lamb-stew-guinness/)

There are a couple of things that puts this recipe on our recipe list every few cooks. One is that the fire-roasted diced tomatoes add a nice kick (but not too much) to this hearty stew. The other is that we frequently buy a half or a whole lamb, and you can use the "strange" cuts for the meat for this one (e.g., rib plates, etc.). We are not fans of very thin soups, but even this thin broth packs such a punch that we don't end up skimping on the stock like we do for some recipes. Oh yeah, and if you make your own lamb stock, it is even more delicious! The Guinness adds a nice acid punch.
Reheating this one is a breeze. Everything stays nice and most, and nothing really overheats or breaks down on the reheat.
Tuesday, July 3, 2018
Never Too Many Breakfast Ideas
So we've recently made several batches of these homemade breakfast egg muffins (think like the frozen Jimmy Dean ones, but better).
General menu:
18 eggs
2 cups half n half
8 oz. cheddar (I like farmstyle cut cheddar)
meat (a lb. of sausage or bacon or....)
veg (2 green peppers or broccoli, or....)
green onions to top
salt and pepper to taste
Yield: A few more than 24 muffins (use silicone muffin tins)
Assemble: Liberally spray silicone tins (yes, they're nonstick, but you will have better traction removing your breakfast muffins). Spread a scant layer of meat on the bottom, followed by scant layer of veggies and cheese. Pour in a beaten mixture of egg, half n half, and seasoning. Cover with green onions. Bake for 35-40 minutes.
Flash freeze on a cookie sheet and then store in a gallon bag. Serving: 2 muffins.
Reheat: 1:15 on full power....these reheat really nicely!
General menu:
18 eggs
2 cups half n half
8 oz. cheddar (I like farmstyle cut cheddar)
meat (a lb. of sausage or bacon or....)
veg (2 green peppers or broccoli, or....)
green onions to top
salt and pepper to taste
Yield: A few more than 24 muffins (use silicone muffin tins)
Assemble: Liberally spray silicone tins (yes, they're nonstick, but you will have better traction removing your breakfast muffins). Spread a scant layer of meat on the bottom, followed by scant layer of veggies and cheese. Pour in a beaten mixture of egg, half n half, and seasoning. Cover with green onions. Bake for 35-40 minutes.
 |
| Fresh out of the oven bacon, broccoli, and cheddar breakfast muffins |
Reheat: 1:15 on full power....these reheat really nicely!
Monday, April 24, 2017
Creating a Shopping List Part 1: How to be Efficient and Economical
Creating a shopping list for freezer cooking seems daunting, and there are many things to consider. Some of the things I try to balance when making a shopping list are:
Creating a variety of food that you can actually store:
1) Find about 12 recipes (your mileage will vary depending on your family and freezer size, but leave room to add 2 recipes at the end to use up your extra ingredients). So for us, we select 12 recipes that we plan to double, and plan to have at least 2 more we make at the end.
2) Select recipes with a variety of meats. I'll usually select more chicken recipes than anything else, in order to use up a bag of thighs and a bag of breasts from Costco. However, I try to have a few beef recipes, a few pork, a couple of seafood, and a few vegetarian recipes. If you're not a vegetarian, I still recommend a few vegetarian recipes. That way, you can add in extra meat in those if you end up with some at the end.
3) Select a variety of final products. I want a few soups, a few curries, a few "slabs o' meat" (i.e. whole chicken breasts with a marinade), a few burgers, a few wraps for lunch, and maybe a few casseroles or lasagnas.
4) Consider what you have containers for. Some recipes go easily into Ziploc or freezer bags, but some require a container, such as lasagna, stuffed shells, layered casseroles. Those are your limiting recipes.
Being Economical
In terms of being economical, there are sort of two approaches: making smart purchasing decisions, and wasting less food.
Saving Money at the Purchasing Stage:
1) At the list stage, if you notice an unusual ingredient in a small amount in some recipe, see if you can find another recipe that uses that same ingredient. We did this with sun-dried tomatoes once. While this may classify as wasting less food, it is a decision to make up front.
2) Select recipes with ingredients that are on sale or seasonal.
3) Explore different groceries in your area, including "ethnic" markets. We have an Asian market near us with incredible deals on produce (e.g., instead of paying $3 for a bit of mint, you pay $1 for a huge handful of mint). Consider it an adventure for a day, and check out some places in your area that you might not have!
4) Buy in bulk. Not only are foods often cheaper in bulk, but you can buy EXACTLY how much you need.
Wasting Less Food:
1) Make a big stone soup at the end. Throw everything in. Be creative. All you really need is a grain/bean, a meat, some veggies, broth, and tomato something (sauce, paste, diced). You always have some spices around, so add those in, too.
2) Along the same lines, use up leftover ingredients in wraps, calzones, pitas, etc. Another interesting solution is to use http://www.supercook.com/ to use up your ingredients. You select a few ingredients, and Supercook will pull up recipes you can make. It will make some assumptions about staples you might have in your kitchen. Alternatively, be prepared to go back to the store at the end to buy one or two more ingredients to make a final recipe with your leftovers.
3) Learn how to store leftover ingredients. The most brilliant example of this is something I saw on Pinterest. You know how recipes always call for ONE chipotle pepper? Well, the rest of the can always goes bad. However, you can puree the can of peppers in a blender, portion it into ice cube trays, and VOILA, you now have individual chipotle pepper servings for the next recipe. No waste!
(http://ourbestbites.com/2011/04/how-to-work-with-canned-chipotle-peppers-in-adobo-sauce/) Here is another tip for tomato paste: http://www.marthastewart.com/273278/tomato-paste-saver
Creating a variety of food that you can actually store:
1) Find about 12 recipes (your mileage will vary depending on your family and freezer size, but leave room to add 2 recipes at the end to use up your extra ingredients). So for us, we select 12 recipes that we plan to double, and plan to have at least 2 more we make at the end.
2) Select recipes with a variety of meats. I'll usually select more chicken recipes than anything else, in order to use up a bag of thighs and a bag of breasts from Costco. However, I try to have a few beef recipes, a few pork, a couple of seafood, and a few vegetarian recipes. If you're not a vegetarian, I still recommend a few vegetarian recipes. That way, you can add in extra meat in those if you end up with some at the end.
3) Select a variety of final products. I want a few soups, a few curries, a few "slabs o' meat" (i.e. whole chicken breasts with a marinade), a few burgers, a few wraps for lunch, and maybe a few casseroles or lasagnas.
4) Consider what you have containers for. Some recipes go easily into Ziploc or freezer bags, but some require a container, such as lasagna, stuffed shells, layered casseroles. Those are your limiting recipes.
Being Economical
In terms of being economical, there are sort of two approaches: making smart purchasing decisions, and wasting less food.
Saving Money at the Purchasing Stage:
1) At the list stage, if you notice an unusual ingredient in a small amount in some recipe, see if you can find another recipe that uses that same ingredient. We did this with sun-dried tomatoes once. While this may classify as wasting less food, it is a decision to make up front.
2) Select recipes with ingredients that are on sale or seasonal.
3) Explore different groceries in your area, including "ethnic" markets. We have an Asian market near us with incredible deals on produce (e.g., instead of paying $3 for a bit of mint, you pay $1 for a huge handful of mint). Consider it an adventure for a day, and check out some places in your area that you might not have!
4) Buy in bulk. Not only are foods often cheaper in bulk, but you can buy EXACTLY how much you need.
Wasting Less Food:
1) Make a big stone soup at the end. Throw everything in. Be creative. All you really need is a grain/bean, a meat, some veggies, broth, and tomato something (sauce, paste, diced). You always have some spices around, so add those in, too.
2) Along the same lines, use up leftover ingredients in wraps, calzones, pitas, etc. Another interesting solution is to use http://www.supercook.com/ to use up your ingredients. You select a few ingredients, and Supercook will pull up recipes you can make. It will make some assumptions about staples you might have in your kitchen. Alternatively, be prepared to go back to the store at the end to buy one or two more ingredients to make a final recipe with your leftovers.
3) Learn how to store leftover ingredients. The most brilliant example of this is something I saw on Pinterest. You know how recipes always call for ONE chipotle pepper? Well, the rest of the can always goes bad. However, you can puree the can of peppers in a blender, portion it into ice cube trays, and VOILA, you now have individual chipotle pepper servings for the next recipe. No waste!
(http://ourbestbites.com/2011/04/how-to-work-with-canned-chipotle-peppers-in-adobo-sauce/) Here is another tip for tomato paste: http://www.marthastewart.com/273278/tomato-paste-saver
Saturday, July 18, 2015
Starter Kit: Top 10 Things to Have on Hand to Begin OAMC (and the Honorable Mention List)
If you are just getting started in once a month cooking (OAMC), it is hard to know where to start or what you might need. This post aims at walking you through the decisions about what you need to get started. Perhaps most importantly, however, this post also addresses three main issues you will need to consider in OAMC: cooking, freezing, and packing. Reheating, while an issue, isn't really so much a supply issue as a technique issue, and it will be covered in subsequent posts.
My husband and I discussed these items over a glass of wine and settled on the following top 10 list. Honorable mentions (things to consider) are listed below as well. :-)
Cooking (4 Items):
One thing you will need to consider is volume and quantity. You are likely to make not only multiple recipes in one day, but also larger batches of each recipe (it is easier to buy ingredients this way, and less labor.... 4 recipes doubled is a lot less work than 8 recipes not doubled).
1) Multiple sets of measuring cups and spoons
Seriously, this is one of the main things we curse about... Particularly tablespoons...we always run out!
2) Large cooking pan/pot
If you double or triple recipes (we do, and we think it is wise from a labor standpoint), you will need at least one LARGE pan and one LARGE pot. If you don't have this, and don't want to invest, at least figure out how much the pots and pans you have can hold. I cannot tell you how many times I started cooking a recipe in a smaller pan/pot only to realize I had gotten overzealous with the doubling.
3) Crock Pot/Pressure Cooker
These serve two purposes....both extra cooking vessels, but also allowing you to multi-task. One pot on the stove, while another recipe slowly working away in a crock pot.... Also, we tend to use the pressure cooker at the end for a stone soup....throw in some dried beans and what you have leftover.... don't even have to soak the beans! I would recommend one or the other.
4) Blender
A good solid blender (we have a Vitamix) is great for making sauces. As you don't do a lot of "dry" things in OAMC, you'll need to make sauces several times. Some of you may say: what about a food processor? I would prioritize a blender over a food pro. Small dice can be done with a knife...Blending...no way! There is nothing like a smooth, fully-blended curry, mole, or jerk sauce.
Freezing (3 Items): One of the great unknowns as you start OAMC is how to freeze things. We find three supplies particularly helpful in this regard.
5) Silicone muffin tins
Want to freeze side dishes like rice or beans? Want to freeze sauce or a topping for a chili? Muffin tins are perfect for this, but you REALLY don't want to deal with a regular metal muffin tin. Even when you spray them with canola oil, you'll spend a lot of time getting things out of a metal muffin tin. With silicone, you just push the pucks of frozen goodness out. In addition to the uses mentioned above, we use the silicone muffin tins to freeze roux, breakfast cups, leftover sauce, etc. This item is ALWAYS used in our OAMC kitchen.
6) Cookie Sheets
If you're not a baker, this is something you might not anticipate as being useful. We use cookie sheets to "flash" freeze burgers, 2 person servings of meatloaf, polenta, etc. You spray the cookie sheet with canola oil, form a patty, etc., and stick in the freezer.
7) Ice Cube Trays/Small Silicone Muffin Tins
You might want these for the same reason you'd want a silicone muffin tin...but for smaller amounts of sauce, like an aioli for a burger, etc. We also use the ice cube trays to freeze pureed, caned chipotle peppers (you know you use one for a recipe and then end up throwing out the rest of even a little can....alternatively, puree the rest of the can in a blender and portion this into ice cube trays...reheat a single chipotle pepper cube for your next recipe). We've also frozen the Costco guacamole for wraps and other things. VERY useful.
Packing (3 Items):
8) Kitchen Scale
I really feel like this is an essential item. If you are doing OAMC for health reasons, a kitchen scale allows you to make reasonable and consistent portion sizes. You may wonder if you can get by with measuring cups, but I don't think there is a good way to be really consistent without a scale. A recommended 3-4 ounce protein portion (like tenderloin or pulled pork) is easy to create with a scale. A 1/4 lb. burger is easy to create with a scale.
9) Containers (Ziploc, other)
A big question that comes up is how to package things...plastic or glass? Vacuum sealer? In my mind, you need two types of containers: those for recipes that don't have a structure (pasta, soup, stir fry), and those that do (lasagna, casserole). I am a fan of ziploc bags (quart) for those recipes that don't have a structure. We have never tried a vacuum sealer, though I am curious about the ability to clean the bags in a dishwasher (hate the waste of Ziplocs). You will also want gallon zips for things like burgers or pucks of frozen sauce (see silicone muffin tin discussion above). For containers, I prefer the versatile oven/freezer safe glass containers, and those that are SQUARE or RECTANGULAR in size as they pack better in the freezer. These pyrex dishes I love, and they are available at Fred Meyer. (Can you say "2-person lasagna portion?") I have a few backup Tupperware type containers, but they are limited in use, and supposedly give off toxins in the microwave.
I also think foil sheets are a must for efficiency if you do wraps or other things that you want to wrap in foil. Saves time and foil!
10) Quart yogurt containers
You might be scratching your head about this one. Imagine having 12 portions of soup to package. You have 12 Ziploc bags.... How do you hold the bag open and scoop without making a mess? Do you seal the bag right away or wait to see if the portion sizes come out right? By putting a Ziploc in a yogurt container, they stay open and upright. Yogurt containers are easy to come by, and easy to clean, and you can store a bajillion of them in a tight space. Other options (like this doodad), seem to cost too much, but also, you won't be able to finagle a large ladle of soup into them without knocking them over.
Honorable Mention:
Silicone Lids: Don't waste saran or foil covering up things in the fridge. Get a set of silicone lids that can be easily handled and washed.
Mandoline: You will do so much slicing.... if you do any kind of fine knife work, you will like having a mandoline on hand.
Hotel Pans: Allow you to store and stack recipes, and give them large surface area to cool. Also, they are metal, so you don't mind scraping a metal measuring cup against them to get a consistent portion. Easier to scoop out of than a round bottomed bowl.
Ice Cream Scoop: Once you try to do burgers with a measuring cup and have the goop stick inside, you'll want an ice cream scoop.
Ladles: You cannot have enough. Useful for cooking and packing. Large spoons work, but ladles won't scrape your pans.
My husband and I discussed these items over a glass of wine and settled on the following top 10 list. Honorable mentions (things to consider) are listed below as well. :-)
Cooking (4 Items):
One thing you will need to consider is volume and quantity. You are likely to make not only multiple recipes in one day, but also larger batches of each recipe (it is easier to buy ingredients this way, and less labor.... 4 recipes doubled is a lot less work than 8 recipes not doubled).
1) Multiple sets of measuring cups and spoons
Seriously, this is one of the main things we curse about... Particularly tablespoons...we always run out!
 |
| Yep, we have this many measuring cups! |
 |
| Especially needed are multiple tablespoons. |
2) Large cooking pan/pot
If you double or triple recipes (we do, and we think it is wise from a labor standpoint), you will need at least one LARGE pan and one LARGE pot. If you don't have this, and don't want to invest, at least figure out how much the pots and pans you have can hold. I cannot tell you how many times I started cooking a recipe in a smaller pan/pot only to realize I had gotten overzealous with the doubling.
 |
| We even have one pot larger than this we got from restaurant supply. |
3) Crock Pot/Pressure Cooker
These serve two purposes....both extra cooking vessels, but also allowing you to multi-task. One pot on the stove, while another recipe slowly working away in a crock pot.... Also, we tend to use the pressure cooker at the end for a stone soup....throw in some dried beans and what you have leftover.... don't even have to soak the beans! I would recommend one or the other.
 |
| Both will save you time and allow you to multi-task. |
4) Blender
A good solid blender (we have a Vitamix) is great for making sauces. As you don't do a lot of "dry" things in OAMC, you'll need to make sauces several times. Some of you may say: what about a food processor? I would prioritize a blender over a food pro. Small dice can be done with a knife...Blending...no way! There is nothing like a smooth, fully-blended curry, mole, or jerk sauce.
 |
| Don't skimp on the blender! |
Freezing (3 Items): One of the great unknowns as you start OAMC is how to freeze things. We find three supplies particularly helpful in this regard.
5) Silicone muffin tins
Want to freeze side dishes like rice or beans? Want to freeze sauce or a topping for a chili? Muffin tins are perfect for this, but you REALLY don't want to deal with a regular metal muffin tin. Even when you spray them with canola oil, you'll spend a lot of time getting things out of a metal muffin tin. With silicone, you just push the pucks of frozen goodness out. In addition to the uses mentioned above, we use the silicone muffin tins to freeze roux, breakfast cups, leftover sauce, etc. This item is ALWAYS used in our OAMC kitchen.
 |
| Go silicone instead of metal muffin tins for OAMC. |
6) Cookie Sheets
If you're not a baker, this is something you might not anticipate as being useful. We use cookie sheets to "flash" freeze burgers, 2 person servings of meatloaf, polenta, etc. You spray the cookie sheet with canola oil, form a patty, etc., and stick in the freezer.
 |
| I like some with lips and some without. You can bake bacon in the ones with lips! |
7) Ice Cube Trays/Small Silicone Muffin Tins
You might want these for the same reason you'd want a silicone muffin tin...but for smaller amounts of sauce, like an aioli for a burger, etc. We also use the ice cube trays to freeze pureed, caned chipotle peppers (you know you use one for a recipe and then end up throwing out the rest of even a little can....alternatively, puree the rest of the can in a blender and portion this into ice cube trays...reheat a single chipotle pepper cube for your next recipe). We've also frozen the Costco guacamole for wraps and other things. VERY useful.
 |
| Use ice cube trays or small muffin tins to freeze aiolis or single serve sauces. |
Packing (3 Items):
8) Kitchen Scale
I really feel like this is an essential item. If you are doing OAMC for health reasons, a kitchen scale allows you to make reasonable and consistent portion sizes. You may wonder if you can get by with measuring cups, but I don't think there is a good way to be really consistent without a scale. A recommended 3-4 ounce protein portion (like tenderloin or pulled pork) is easy to create with a scale. A 1/4 lb. burger is easy to create with a scale.
 |
| If you're doing OAMC for health reasons, you NEED a kitchen scale. |
9) Containers (Ziploc, other)
A big question that comes up is how to package things...plastic or glass? Vacuum sealer? In my mind, you need two types of containers: those for recipes that don't have a structure (pasta, soup, stir fry), and those that do (lasagna, casserole). I am a fan of ziploc bags (quart) for those recipes that don't have a structure. We have never tried a vacuum sealer, though I am curious about the ability to clean the bags in a dishwasher (hate the waste of Ziplocs). You will also want gallon zips for things like burgers or pucks of frozen sauce (see silicone muffin tin discussion above). For containers, I prefer the versatile oven/freezer safe glass containers, and those that are SQUARE or RECTANGULAR in size as they pack better in the freezer. These pyrex dishes I love, and they are available at Fred Meyer. (Can you say "2-person lasagna portion?") I have a few backup Tupperware type containers, but they are limited in use, and supposedly give off toxins in the microwave.
I also think foil sheets are a must for efficiency if you do wraps or other things that you want to wrap in foil. Saves time and foil!
 |
| If you need to get formal containers, get square or rectangular ones that pack well in freezer drawers. |
 |
| Maybe it seems frivolous? If you make lots of wraps, you'll want foil sheets. |
10) Quart yogurt containers
You might be scratching your head about this one. Imagine having 12 portions of soup to package. You have 12 Ziploc bags.... How do you hold the bag open and scoop without making a mess? Do you seal the bag right away or wait to see if the portion sizes come out right? By putting a Ziploc in a yogurt container, they stay open and upright. Yogurt containers are easy to come by, and easy to clean, and you can store a bajillion of them in a tight space. Other options (like this doodad), seem to cost too much, but also, you won't be able to finagle a large ladle of soup into them without knocking them over.
 |
| Ziploc bags fit over these nicely and allow you to dish food into them without mess. |
Honorable Mention:
Silicone Lids: Don't waste saran or foil covering up things in the fridge. Get a set of silicone lids that can be easily handled and washed.
Mandoline: You will do so much slicing.... if you do any kind of fine knife work, you will like having a mandoline on hand.
Hotel Pans: Allow you to store and stack recipes, and give them large surface area to cool. Also, they are metal, so you don't mind scraping a metal measuring cup against them to get a consistent portion. Easier to scoop out of than a round bottomed bowl.
Ice Cream Scoop: Once you try to do burgers with a measuring cup and have the goop stick inside, you'll want an ice cream scoop.
Ladles: You cannot have enough. Useful for cooking and packing. Large spoons work, but ladles won't scrape your pans.
Wednesday, July 1, 2015
Making Burgers: Chipotle Black Bean Burgers
This week I thought I'd focus on making burgers for once a month cooking. Though many people think that OAMC is all about casseroles and soups, it really isn't! Burgers reheat well directly from frozen, and they are a great way to incorporate seafood, which is usually tricky to reheat. Alternatively, there are some great vegetarian burger recipes out there, so you can also go healthy if you like. In fact, the burger recipe I did for this post is a vegetarian chipotle black bean burger with corn. Original recipe was found at Bev Cooks. The ingredients for four burgers are listed below, so you can shop a little by ingredient before clicking the link to view the directions:
Ingredients for 4 burgers:
This recipe actually instructs you to bake the burgers, but I froze them using my typical method, which involves a sort of flash freezing method that will allow pan reheating later. First, you'll want to spray some cookie or baking sheets with canola oil. This will make it easier to get the burgers off later. You'll also want an ice cream scooper (or alternatively, a measuring cup) to create equal size burgers. I prefer the ice cream scooper as the goopier burgers tend to stick in the measuring cups.
After you've sprayed your cookie sheet, you'll want to scoop your burger mixture with the ice cream scooper. I use a heavily heaped scoop for appropriate size burgers the way I like them, but you can play around. Another option is to use your kitchen scale to weigh out 1/4 lb. or 1/2 lb. patties.
Keep scooping patties, leaving room to smush out and form the patties when you're out of the mixture.
Then you simply place the burgers in the freezer for several hours until frozen solid. They should come right off the cookie sheet, but if not, a rubber spatula should help to loosen them. Then you can place the burgers in a gallon zip lock or other container. The bonus to freezing this way is that the burgers do not stick together in the zip lock bag, since they were frozen individually. Another bonus to freezing burgers this way is that more fragile burgers tend to hold up better (those with lots of veggies, low amounts of binders like egg or bread crumbs).
Tips:
Ingredients for 4 burgers:
- 1 (14.5 oz) can of black beans, drained and rinsed
- 2 Tbs. minced white onion
- 2 cloves garlic, minced
- 1/4 cup smoked chopped almonds
- 1/2 cup frozen corn, thawed
- 1/3 cup chopped cilantro
- 4 Tbs. jarred chipotle spread, divided
- 1 egg
Toppings:
- 4 sliced pepper jack cheese
- 4 onion buns, split and lightly toasted
- mixed greens
- sliced avocado
- coarse salt, to taste
- lime wedges, for serving
This recipe actually instructs you to bake the burgers, but I froze them using my typical method, which involves a sort of flash freezing method that will allow pan reheating later. First, you'll want to spray some cookie or baking sheets with canola oil. This will make it easier to get the burgers off later. You'll also want an ice cream scooper (or alternatively, a measuring cup) to create equal size burgers. I prefer the ice cream scooper as the goopier burgers tend to stick in the measuring cups.
 |
| Set up for freezing burgers: cookie sheet, spray oil, and an ice cream scoop. |
 |
| Heaping scoop for a nicely-sized burger patty. |
 |
| Scoops of burger mixture, leaving room to form the patties. |
 |
| Formed patties. |
Tips:
- When planning for once a month cooking, do the burgers early on in your recipes, as it takes up room in the freezer to freeze them using this method.
- Don't forget to consider meatball recipes for tasty burgers (yep, you heard me correctly). You'll have to play with the portion size a bit with a meatball recipe, but if it is meant to hold together for a meatball, it should do well as a burger.
- If the burger recipe includes a tasty mayo or aioli, consider freezing it in ice cube trays for single serving portions.
- Rewarm the frozen patty in a pan over low heat with some cooking oil. You're still trying to brown the patty, but go slow so the frozen center will cook. Alternatively, you can speed up the cooking a bit by steaming, like the pros do. Once your pan is hot and the burger is in, pour 1/4 cup of water in the pan and cover.
Tried and True Recipes Using this Freezer Method:
Subscribe to:
Posts (Atom)